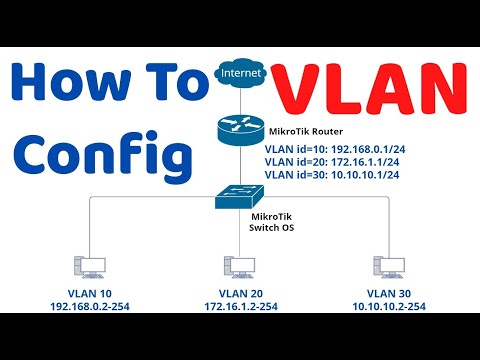
How to Configuration – Basic VLAN on MikroTik router + MikroTik Switch OS
00:00 How to Configuration – Basic VLAN on MikroTik router
00:18 1. Basic Configuration MikroTik Router
00:30 1.1. Login to MikroTik use WinBox
00:44 1.2. Reset Configuration – No Default Configuration
01:22 1.3. Set MikroTik router name (R1)
01:40 1.4. Set interface name
02:26 1.5. Configure PPPoE Client on WAN interface
03:20 1.6. Configure DNS
03:52 1.7. Configure NAT for LAN (Source NAT)
04:40 1.8. Testing (R1)
05:11 2. Configure VLAN on MikroTik router
05:23 2.1. Add VLAN interface
06:28 2.2. Set the IP address of the VLAN interface
07:32 2.3. Configure DHCP Server for VLAN10 interface
08:18 2.4. Configure DHCP Server for VLAN20 interface
08:58 2.5. Configure DHCP Server for VLAN30 interface
09:38 2.6. Rename DHCP Pool
10:38 3. Configure VLAN on MikroTik Switch OS
11:32 4. Testing VLAN on client PC
11:44 4.1. Testing VLAN id=30 on client PC (Raspberry Pi).
13:10 4.2. Testing VLAN id=20 on client PC (Raspberry Pi).
14:30 4.3. Testing VLAN id=10 on client PC (Windows 10). .
Comments are closed.